MIT6828-Lab3-用户环境

且将杯酒对星河

介绍

本文将实现使用户环境(即进程)运行的内核功能。在本实验中,你需要:

  • 建立起跟踪进程的数据结构
  • 创建一个进程
  • 载入程序镜像
  • 让程序运行
  • 处理进程的系统调用

开始

1
2
3
4
5
6
7
8
9
10
11
12
13
14
15
athena% cd ~/6.828/lab
athena% add git
athena% git commit -am 'changes to lab2 after handin'
Created commit 734fab7: changes to lab2 after handin
4 files changed, 42 insertions(+), 9 deletions(-)
athena% git pull
Already up-to-date.
athena% git checkout -b lab3 origin/lab3
Branch lab3 set up to track remote branch refs/remotes/origin/lab3.
Switched to a new branch "lab3"
athena% git merge lab2
Merge made by recursive.
kern/pmap.c | 42 +++++++++++++++++++
1 files changed, 42 insertions(+), 0 deletions(-)
athena%

首先,合并lab2,然后切换至lab3,在lab3中,你需要参考及阅读的源码如下:

点击显/隐内容
目录 文件 功能 进度
inc/ env.h Public definitions for user-mode environments 完成
trap.h Public definitions for trap handling 完成
syscall.h Public definitions for system calls from user environments to the kernel
lib.h Public definitions for the user-mode support library
kern/ env.h Kernel-private definitions for user-mode environments
env.c Kernel code implementing user-mode environments
trap.h Kernel-private trap handling definitions
trap.c Trap handling code
trapentry.S Assembly-language trap handler entry-points
syscall.h Kernel-private definitions for system call handling
syscall.c System call implementation code
lib/ Makefrag Makefile fragment to build user-mode library, obj/lib/libjos.a
entry.S Assembly-language entry-point for user environments
libmain.c User-mode library setup code called from entry.S
syscall.c User-mode system call stub functions
console.c User-mode implementations of putchar and getchar, providing console I/O
exit.c User-mode implementation of exit
panic.c User-mode implementation of panic
user/ * Various test programs to check kernel lab 3 code

实验需求

本次实验有AB两个部分,你需要分别完成,并至少完成一个挑战实验。

内联汇编

GCC提供了内联汇编功能,参考该网站获得内联汇编讲解

第一部分:进程和异常处理

inc/env.h包含了进程的一些定义,内核使用Env追踪进程,在kern/env.c中,包含如下全局变量:

1
2
3
struct Env *envs = NULL;		    // All environments,指向一个进程array
struct Env *curenv = NULL; // The current env,正在运行的进程,在第一个进程执行前为NULL
static struct Env *env_free_list; // Free environment list

JOS允许的最大活动线程数定义在inc/env.h中,为1<<10即1024个。env_free_list为不活跃的Env链表,在表中添加或删除Env,即可分配或释放进程。

进程状态

我们使用Env结构体对进程进行描述,Env结构体如下:

点击显/隐内容
1
2
3
4
5
6
7
8
9
10
11
12
struct Env {
struct Trapframe env_tf; // Saved registers 保存进程未执行时的寄存器,即内核或其他进程运行时,trapframe
struct Env *env_link; // Next free Env
envid_t env_id; // Unique environment identifier
envid_t env_parent_id; // env_id of this env's parent
enum EnvType env_type; // Indicates special system environments
unsigned env_status; // Status of the environment
uint32_t env_runs; // Number of times environment has run

// Address space
pde_t *env_pgdir; // Kernel virtual address of page dir
};

结构体成员功能如下:

env_tf:保存进程未执行时的寄存器,即内核或其他进程运行时的寄存器。发生进程切换时,内核将保存该寄存器。

env_link:指向env_free_list中的下一个空闲进程

env_id:使用当前Env的进程的id,当进程被回收后,内核可能会将同一个Env分配给其他进程,但是进程号会发生改变

env_parent_id:父进程id

env_type:进程类型,对于大多数进程,都是用户进程,即ENV_TYPE_USER

env_status:进程状态,有如下几种:

ENV_FREE:不活跃进程,位于env_free_list

ENV_RUNNABLE:等待执行的进程

ENV_RUNNING:正在执行的进程

ENV_NOT_RUNNABLE:活跃的进程,但是尚未准备运行,例如等待另一个进程通信的进程

ENV_DYING:僵尸进程,将会在下一次陷入内核时被回收

env_pgdir:保存着当前进程页目录的内核虚拟地址

陷帧

我一直没有对这个名词找到一个合适的翻译,姑且顾名思义,称其为“陷帧”,因为进程切换是需要陷入内核的。

陷帧的作用如下,如果把进程的执行比作动画,动画是一帧一帧播放的,相应地,我们的进程也是一帧一帧执行的,我们使用一个结构体对进程关键信息进行描述。这个结构体称为陷帧。在这个帧中,保存有进程执行时的关键寄存器。当我们进行进程或线程切换时,实际就是先将当前进程的陷帧进行保存,然后加载新进程的陷帧

点击显/隐内容
1
2
3
4
5
6
7
8
9
10
11
12
13
14
15
16
17
18
struct Trapframe {
struct PushRegs tf_regs;
uint16_t tf_es; // es段寄存器
uint16_t tf_padding1;
uint16_t tf_ds; // ds数据段寄存器 pushl
uint16_t tf_padding2;
uint32_t tf_trapno;
/* below here defined by x86 hardware */
uint32_t tf_err;
uintptr_t tf_eip; // eip指令指针寄存器
uint16_t tf_cs; // cs代码段寄存器
uint16_t tf_padding3;
uint32_t tf_eflags;
/* below here only when crossing rings, such as from user to kernel */
uintptr_t tf_esp; // 栈顶指针寄存器
uint16_t tf_ss; // 堆栈段寄存器
uint16_t tf_padding4;
} __attribute__((packed));

分配进程array

在上一个lab中,我们在mem_init函数中为pages[]分配了空间,类似地,分配一个env[],用于保存Env结构体,这个比较简单,参考pages分配过程即可,具体代码如下:

1
2
3
4
5
6
7
8
9
10
11
12
13
//////////////////////////////////////////////////////////////////////
// Make 'envs' point to an array of size 'NENV' of 'struct Env'.
n = NENV * sizeof(struct Env);
envs = (struct Env*) boot_alloc(n);
memset(envs, 0, n);

//////////////////////////////////////////////////////////////////////
// Map the 'envs' array read-only by the user at linear address UENVS
// (ie. perm = PTE_U | PTE_P).
// Permissions:
// - the new image at UENVS -- kernel R, user R
// - envs itself -- kernel RW, user NONE
boot_map_region(kern_pgdir, UENVS, PTSIZE, PADDR(envs), PTE_U | PTE_P);

现在你的代码应该能够通过check_kern_pgdir()

进程创建及运行

现在编写kern/env.c中的代码,运行一个用户进程。目前我们尚未提供文件系统,因此我们需要进程加载一个写死在内核中的静态二进制镜像作为进程。Lab3中使用了一些手段,将用户程序与内核进行了强绑定,具体实现可以参考参考文献2。现在,请完成如下函数

练习2:在文件env.c中,完成如下代码:

env_init():初始化所有Env结构体对象,然后添加至env_free_list中,调用env_init_percpu,配置分段硬件优先级(0为内核,3为用户)

env_init()

函数原型

该函数实现了envs以及env_free_list的初始化,其原型如下:

1
2
3
4
5
6
7
8
9
10
11
12
13
14
// Make sure the environments are in the free list in the same order
// they are in the envs array (i.e., so that the first call to
// env_alloc() returns envs[0]).
//

void
env_init(void)
{
// Set up envs array
// LAB 3: Your code here.

// Per-CPU part of the initialization
env_init_percpu();
}

根据注释,我们可以总结该函数如下工作:

  • env_id设置为0
  • env按与array一致的顺序插入env_free_list
函数实现

该工作比较简单,实际就是一个链表的插入问题,直接得到代码如下:

1
2
3
4
5
6
7
8
9
env_free_list = envs;
size_t i;
for(i = 0; i < NENV-1; ++i){
envs[i].envid = 0;
envs[i].env_link = &envs[i+1];
}

envs[i].envid = 0;
envs[i].env_link = NULL;
改进

上面的实现中,链表是正序插入的,代码比较繁琐,可以采用倒插法实现:

1
2
3
4
5
6
7
8
9
10
11
12
13
14
15
16
void
env_init(void)
{
// Set up envs array
env_free_list = NULL;
for(int i = NENV-1; i>= 0; --i){
// Mark all environments in 'envs' as free, set their env_ids to 0,
// and insert them into the env_free_list.
envs[i].env_status = ENV_FREE;
envs[i].env_id = 0;
envs[i].env_link = env_free_list;
env_free_list = &envs[i];
}
// Per-CPU part of the initialization
env_init_percpu();
}

env_setup_vm()

函数原型
点击显/隐内容
1
2
3
4
5
6
7
8
9
10
11
12
13
14
15
16
17
18
19
20
21
22
// Initialize the kernel virtual memory layout for environment e.
// Allocate a page directory, set e->env_pgdir accordingly,
// and initialize the kernel portion of the new environment's address space.
// Do NOT (yet) map anything into the user portion
// of the environment's virtual address space.
//
// Returns 0 on success, < 0 on error. Errors include:
// -E_NO_MEM if page directory or table could not be allocated.
//
static int
env_setup_vm(struct Env *e)
{
struct PageInfo *p = NULL;
if (!(p = page_alloc(ALLOC_ZERO))) //分配一个物理页
return -E_NO_MEM;

// LAB 3: Your code here.

e->env_pgdir[PDX(UVPT)] = PADDR(e->env_pgdir) | PTE_P | PTE_U;

return 0;
}
函数功能

从上面的注释中,我们能抽象出该函数具体的工作,即给进程e分配内核虚拟地址空间。首先我们申请了一张页,该页要作为e->env_pgdir的页目录,我们要将这段空间的虚拟地址给了env_pgdir。此外,还需要手动将该页的引用递增一下。

具体实现
点击显/隐内容
1
2
3
4
5
6
7
8
9
10
11
12
13
14
15
16
17
18
19
20
21
22
23
24
25
26
static int
env_setup_vm(struct Env *e)
{
struct PageInfo *p = NULL;

// Allocate a page for the page directory
if (!(p = page_alloc(ALLOC_ZERO))) //分配一个物理页
return -E_NO_MEM;

// In general, pp_ref is not maintained for
// physical pages mapped only above UTOP, but env_pgdir
// is an exception -- you need to increment env_pgdir's
// pp_ref for env_free to work correctly.
p->pp_ref++;
// Now, set e->env_pgdir and initialize the page directory.
e->env_pgdir = (pde_t *) page2kva(p); // 将分配的页用作页目录
// The VA space of all envs is identical above UTOP
// (except at UVPT, which we've set below).
memcpy(e->env_pgdir, kern_pgdir, PGSIZE); // * 重要,将内核页目录拷贝给每个进程

// UVPT maps the env's own page table read-only.
// Permissions: kernel R, user R
e->env_pgdir[PDX(UVPT)] = PADDR(e->env_pgdir) | PTE_P | PTE_U; // UVPT指向用户页目录地址

return 0;
}
改进

在上面的实现中,我们还需要对env_pgdir指向的页进行初始化,初始化内核部分,因此还需要下面一句

1
memcpy(e->env_pgdir, kern_pgdir, PGSIZE);

这一句说明,每个进程都了解内核的页目录。

region_alloc(struct Env e, void va, size_t len)

为进程e分配长度为len的物理内存,然后映射至va

具体实现
点击显/隐内容
1
2
3
4
5
6
7
8
9
10
11
12
13
14
15
16
17
18
19
20
static void
region_alloc(struct Env *e, void *va, size_t len)
{
// It is easier to use region_alloc if the caller can pass
// 'va' and 'len' values that are not page-aligned.
// You should round va down, and round (va + len) up.
// (Watch out for corner-cases!)
void* start = (void *)ROUNDDOWN((uint32_t)va, PGSIZE); //对齐操作
void* end = (void *)ROUNDUP((uint32_t)(va + len), PGSIZE);

for(; start <= end; start += PGSIZE){
struct PageInfo *pp = page_alloc(0);
if(pp == NULL){
panic("region_alloc: page_alloc failed\n");
}
if(page_insert(e->env_pgdir, pp, start, PTE_W | PTE_U) == -E_NO_MEM){
panic("region_alloc: page_insert failed, no enough room\n");
}
}
}

load_icode()

函数原型
1
2
3
4
5
6
7
8
9
10
11
12
13
14
15
16
17
18
19
20
21
22
23
24
//
// Set up the initial program binary, stack, and processor flags
// for a user process. 设置程序二进制文件
// This function is ONLY called during kernel initialization,
// before running the first user-mode environment.
//
// This function loads all loadable segments from the ELF binary image
// into the environment's user memory, starting at the appropriate
// virtual addresses indicated in the ELF program header.
// At the same time it clears to zero any portions of these segments
// that are marked in the program header as being mapped
// but not actually present in the ELF file - i.e., the program's bss section.
//
// All this is very similar to what our boot loader does, except the boot
// loader also needs to read the code from disk. Take a look at
// boot/main.c to get ideas.
//
// load_icode panics if it encounters problems.
// - How might load_icode fail? What might be wrong with the given input?
//
static void
load_icode(struct Env *e, uint8_t *binary)
{
}
函数功能

这个函数将会为一个用户进程设置初始程序的二进制文件、栈以及处理器标志位,该函数只在内核初始化阶段执行。

具体实现

为了实现该函数,我们需要解决如下问题:

  • 将ELF格式的二进制文件载入用户进程内存空间
  • 将程序的.bss段置零
  • 映射一个内存页给用户的进程栈

函数具体实现如下:

点击显/隐内容
1
2
3
4
5
6
7
8
9
10
11
12
13
14
15
16
17
18
19
20
21
22
23
24
25
26
27
28
29
30
31
32
33
34
35
36
37
38
39
40
41
42
43
44
45
46
47
48
49
50
51
static void
load_icode(struct Env *e, uint8_t *binary)
{
if(e == NULL || binary == NULL){
panic("load_icode: wrong pointer!\n");
}
struct Proghdr *ph, *eph;
struct ELF *ELFHDR = (struct ELF *)binary;
if(ELFHDR->e_magic != ELF_MAGIC)
panic("load_icode: wrong Elf format!\n");
ph = (struct Proghdr *)((uint8_t *)ELFHDR + ELFHDR->e_phoff);
eph = ph + ELFHDR->e_phnum;
// Load each program segment into virtual memory
// at the address specified in the ELF section header.
for(; ph < eph; ph++){
// You should only load segments with ph->p_type == ELF_PROG_LOAD.
if(ph->p_type == ELF_PROG_LOAD){
// 在ph->p_va分配能够容纳p_memsz的物理页
// Each segment's virtual address can be found in ph->p_va
// and its size in memory can be found in ph->p_memsz.
// All page protection bits should be user read/write for now.
// ELF segments are not necessarily page-aligned, but you can
// assume for this function that no two segments will touch
// the same virtual page.
region_alloc(e, ph->p_va, ph->p_memsz);

// Loading the segments is much simpler if you can move data
// directly into the virtual addresses stored in the ELF binary.
// So which page directory should be in force during
// this function?

// The ph->p_filesz bytes from the ELF binary, starting at
// 'binary + ph->p_offset', should be copied to virtual address
// ph->p_va.
memcpy(ph->p_va, binary + ph->p_offset, ph->p_filesz);

// Any remaining memory bytes should be cleared to zero.
// (The ELF header should have ph->p_filesz <= ph->p_memsz.)
// Use functions from the previous lab to allocate and map pages.
memset(ph->p_va + ph->p_filesz, 0, ph->p_memsz - ph->p_filesz);
}
}

// Now map one page for the program's initial stack
// at virtual address USTACKTOP-PGSIZE
region_alloc(e, USTACKTOP-PGSIZE, PGSIZE); // 用户栈的虚拟地址都是一样的

// You must also do something with the program's entry point,
// to make sure that the environment starts executing there.
// What? (See env_run() and env_pop_tf() below.)
}
调试

这个函数算是partA中最难的函数实现,里面有很多细节一开始没注意到,导致调试时卡在了这里,现在总结一下这个函数中遇到的问题。

首先是内存分配的问题,这里有一个小技巧,要先清空大块内存,再对其中的局部进行拷贝,所以需要将上面的两句内存拷贝和设置语句重新排序

1
2
3
4
5
6
7
// 将下面这两句
memcpy(ph->p_va, binary + ph->p_offset, ph->p_memsz);
memset(ph->p_va + ph->p_filesz, 0, ph->p_memsz - ph->p_filesz);

// 改为下面这两句
memset(ph->p_va, 0, ph->p_memsz); //先全部清空
memcpy(ph->p_va, binary + ph->p_offset, ph->p_filesz); //再进行局部拷贝

然后是内存目录管理,上面的代码遗漏了一个非常重要的部分,即内存目录的切换,由于我们是对用户进程的内存空间进行拷贝,所以必须通知CPU,页目录在e->env_pgdir中,否则CPU还是会继续访问内核内存空间,当访问了不可写的内存区域,内核会发送一个信号停止操作,代码修改如下:

1
2
3
4
5
6
7
8
9
10
11
12
// Change 
lcr3(PADDR(e->env_pgdir)); // 切换至进程页目录

for (int i = 0; i < ph_num; i++) {
if (ph[i].p_type == ELF_PROG_LOAD) {
region_alloc(e, (void *)ph[i].p_va, ph[i].p_memsz);
memset((void *)ph[i].p_va, 0, ph[i].p_memsz);
memcpy((void *)ph[i].p_va, binary + ph[i].p_offset, ph[i].p_filesz);
}
}

lcr3(PADDR(kern_pgdir)); // 切换至内核页目录

现在再来理解一下注释中的这段话

Loading the segments is much simpler if you can move data directly into the virtual addresses stored in the ELF binary. So which page directory should be in force during this function?

这段话的意思就是让我们切换页目录。

最后,我们需要记录一下可执行文件的入口,即第一条语句所在的位置,第一条语句地址是ELFHDR->e_entry,进程e中应当有一个字段专门保存执行时的地址。我们知道CPU是根据eip寄存器找到下一条语句执行的位置的,所以我们要将ELFHDR->e_entry保存于新进程e的陷帧中,即

1
e->env_tf.tf_eip = ELFHDR->e_entry;

env_create()

函数功能

创建一个新的进程,然后载入进程的可执行文件

具体实现
1
2
3
4
5
6
7
8
9
10
11
12
13
14
15
// This function is ONLY called during kernel initialization,
// before running the first user-mode environment.
void
env_create(uint8_t *binary, enum EnvType type)
{
// Allocates a new env with env_alloc, the new env's parent ID is set to 0.
struct Env *e;
env_alloc(&e, 0);

// Loads the named elf binary into it with load_icode
load_icode(e, binary);

// Set the env type to type
e->env_type = type;
}

env_run()

函数功能

运行进程,同时实现内核态到用户态的转换

具体实现
点击显/隐内容
1
2
3
4
5
6
7
8
9
10
11
12
13
14
15
16
17
18
19
20
21
22
23
24
25
26
27
28
29
30
31
32
33
34
35
//
// Context switch from curenv to env e.
// Note: if this is the first call to env_run, curenv is NULL.
//
// This function does not return.
//
void
env_run(struct Env *e)
{
// Hint: This function loads the new environment's state from
// e->env_tf. Go back through the code you wrote above
// and make sure you have set the relevant parts of
// e->env_tf to sensible values.

// Step 1: If this is a context switch (a new environment is running)
// 1. Set the current environment (if any) back to
// ENV_RUNNABLE if it is ENV_RUNNING (think about
// what other states it can be in)
if(curenv != NULL && curenv->env_status == ENV_RUNNING){
curenv->env_status = ENV_RUNNABLE;
}
// 2. Set 'curenv' to the new environment
curenv = e;
// 3. Set its status to ENV_RUNNING
curenv->env_status = ENV_RUNNING;
// 4. Update its 'env_runs' counter
++curenv->env_runs;
// 5. Use lcr3() to switch to its address space
lcr3(PADDR(curenv->env_pgdir)); // 切换页目录至当前进程的页目录

// Step 2: Use env_pop_tf() to restore the environment's
// registers and drop into user mode in the
// environment.
env_pop_tf(&curenv->env_tf); // 进入内核态
}

至此,我们完成了进程管理的几个关键函数,当执行一个进程时,内核会调用load_icode加载并执行hello程序,直到使用系统调用后,通过int在进入内核中。但是这里会出现问题,OS尚未配置硬件实现用户态到内核态的转换。因此会触发保护异常,但是依然无法处理异常,于是又会触发一个保护异常的保护异常(开始套娃)。最终放弃,并产生一个triple fault然后重启系统。

这里我们进行一些调试,以gdb模式启动内核,然后在env_pop_tf处设置断点。这个是进入用户态之前的最后一个函数,在对现场进行了一些保护后,进程跳转至了0x800020这个地址,然后开始执行用户进程。查看obj/user/hello.asm获得hello中调用的系统调用sys_cputs()int的地址(说明系统调用是中断触发的)。找到int $0x30所在地址(0x800a9b),设置断点执行,到这一句前应该都没有问题。如果有问题,那一定是你的问题。

中断和异常处理

现在操作系统已经能够实现内核态到用户态的切换,由于中断会进入内核态,所以我们还需要完成用户态到内核态的切换,实现中断和异常。首先先熟悉x86的中断和异常机制

练习3:阅读如下材料,学习中断和异常背后的硬件知识

IA-32 Developer’s Manual 第五章

受保护的控制转移

异常和中断实际上都是受保护的控制转移,即在内核和用户之间的切换。按照英特尔的术语,中断是一种异步控制转移,而异常是同步的。受保护是指:当中断或异常发生后,当前运行的代码只能以指定的方式进入内核。在x86中,保护是由两种机制提供的:

1 中断描述表(IDT):处理器保证进程只能由内核提供的进入点进入内核。x86提供了256个进入点,即256个中断向量(0-255)。中断向量由中断来源决定。CPU根据中断向量,到中断描述表指定的位置寻找中断描述符,并加载如下内容:

  • 将中断服务函数入口载入EIP中
  • 将服务函数所在的代码段保存在CS寄存器中

2 任务状态段(TSS):在处理中断和异常前,处理器需要一个空间保存旧的状态,例如CS和EIP寄存器中的值,以便后续恢复现场。保存这些状态的空间必须被严格保护,禁止低权限的用户进程访问。因此当发生用户态到内核态的切换时,OS会切换至一个位于内核内存空间的堆栈段,并对关键数据进行保存。TSS即设置了这个堆栈的段选择符和地址。处理器会将SS, ESP, EFLAGS, CS, EIP和一些错误码保存在堆栈中,并从中断描述符中加载CS和EIP,并设置指向新堆栈的ESP和SS。

在JOS中,我们只利用TSS来保存内核堆栈的位置,实际的操作系统中TSS还有许多其他功能。

异常和中断的种类

这一节详见关于中断和异常区别的讲解。本节我们将会处理0-31号中断。下一节我们会处理48号软中断。在Lab4中,我们还会添加一些外部中断,例如定时器中断等。

一个例子

假设处理器正在执行一个用户进程,结果遇到了除零异常,处理器会这样处理:

1 根据TSS中的SS0ESP0字段,跳转至内核栈字段,在JOS中,SS0ESP0的值分别为GD_KDKSTACKTOP

2 将异常参数压入内核栈中,栈顶地址为KSTACKTOP,压完后内核栈如下所示:

图片名称

3 由于我们在处理除零错误,其中断向量号为0,因此处理器读取IDT的入口0,并设置CS:EIP至中断服务函数的入口地址

4 处理函数将会接管并处理异常,例如退出用户程序等

对于特定型号的x86处理器,除了上面的五个标准字段,还会向栈中压入一个错误码(一般是32位),关于错误码详见IA-32 Developer’s Manual 第五章第13节。有了错误码后,在返回时必须弹出错误码,否则会返回错误的位置执行程序。

中断/异常嵌套

中断可能是在内核或者用户态产生,只有从用户态进入内核态时,才需要进行堆栈的切换,即对用户态堆栈的地址进行保存。如果已经位于内核中,那么内核就不需要进行栈切换,直接保存旧的CSEIP即可。此外,对于内核产生的中断,我们可以很轻易地进行嵌套处理。因为内核处理自己的中断,可以简单地理解为函数调用。

极端情况下,当中断嵌套过多后,内核栈会爆掉,这种情况下内核只能重启。一个设计良好的内核应该确保这种极端情况永远不发生。

设置IDT

现在,我们开始设置IDT,处理中断向量号为0-31的中断,首先,阅读 inc/trap.handkern/trap.h,这两个文件包含了一些和中断、异常相关的重要定义。其中,kern/trap.h包含着和内核严格私有的代码,而inc/trap.h包含着和内核和用户态相关的代码。

注意,0-31号向量中有一些是保留的,这些不需要处理。我们实现的中断控制流应当如下所示:

1
2
3
4
5
6
7
8
9
10
11
12
13
14
15
16
17
18
19
20
21
22
23
// 通过IDT,在trapentry中找到中断服务函数入口,然后跳转至trap中
IDT trapentry.S trap.c

+----------------+
| &handler1 |---------> handler1: trap (struct Trapframe *tf)
| | // do stuff {
| | call trap // handle the exception/interrupt
| | // ... }
+----------------+
| &handler2 |--------> handler2:
| | // do stuff
| | call trap
| | // ...
+----------------+
.
.
.
+----------------+
| &handlerX |--------> handlerX:
| | // do stuff
| | call trap
| | // ...
+----------------+

每一个异常或中断都需要有自己的中断服务函数(在trapentry.S中),同时trap_init()将对IDT进行初始化,写入这些服务函数的地址。每个服务函数应当在栈上建立一个struct TrapFrame,然后调用trap()并传入建立的陷帧 (在 trap.c) 。trap将会使用特定的服务函数处理中断和异常。

练习4:编辑trapentry.Strap.c,实现上述功能。trapentry.S中的 TRAPHANDLERTRAPHANDLER_NOEC 宏以及inc/trap.c中的T_*能够帮助你。你需要在trapentry.S中为inc/trap.h中的每一个trap添加一个入口,并提供_alltraps作为TRAPHANDLER的参考。同时,你需要修改trap_init(),初始化idt,令其指向trapentry.S中定义的每一个入口,此处请使用SETGATE宏。

你的_alltraps应当:

  1. 将对应的值压入栈中,使栈看起来像一个陷帧
  2. GD_KD载入%ds%es
  3. pushl %esp ,向trap()传递一个指向陷帧的指针
  4. call traptrap可以返回吗?)

使用pushal,这个指令符合struct Trapframe的布局,在完成上述内容后,make grade应当能够通过Part A

练习4的要求挺多的,我们将问题一个一个拆解,分而治之。经过拆分后,练习4一共需要完成如下功能:

  • trapentry.S中为inc/trap.h中的每一个trap添加一个入口
  • 编写_alltraps函数
  • 修改trap_init(),初始化idt,令其指向trapentry.S中定义的每一个入口

实现顺序

为了解决这个问题,我们考虑如下实现顺序:

  • 首先,在trapentry.S中添加入口,但是不实现
  • 修改trap_init(),初始化idt,令其指向每一个入口

trapentry.S中为inc/trap.h中的每一个trap添加一个入口

TRAPHANDLERTRAPHANDLER_NOEC

我们首先来看一下这两个宏函数,其定义如下:

点击显/隐内容
1
2
3
4
5
6
7
8
9
10
11
12
13
14
15
16
17
18
19
20
21
22
23
24
25
26
27
28
29
30
31
32

/* TRAPHANDLER defines a globally-visible function for handling a trap.
* It pushes a trap number onto the stack, then jumps to _alltraps.
* Use TRAPHANDLER for traps where the CPU automatically pushes an error code.
*
* You shouldn't call a TRAPHANDLER function from C, but you may
* need to _declare_ one in C (for instance, to get a function pointer
* during IDT setup). You can declare the function with
* void NAME();
* where NAME is the argument passed to TRAPHANDLER.
*/
#define TRAPHANDLER(name, num) \
.globl name; /* define global symbol for 'name' */ \
.type name, @function; /* symbol type is function */ \
.align 2; /* align function definition 令函数对齐,即其起始地址为2的倍数*/ \
name: /* function starts here */ \
// 在此处CPU会自动压入一个错误码
pushl $(num); /* 将num地址压栈 */ \
jmp _alltraps

/* Use TRAPHANDLER_NOEC for traps where the CPU doesn't push an error code.
* It pushes a 0 in place of the error code, so the trap frame has the same
* format in either case.
*/
#define TRAPHANDLER_NOEC(name, num) \
.globl name; \
.type name, @function; \
.align 2; \
name: \
pushl $0; /* 错误码占位 */ \
pushl $(num); \
jmp _alltraps

这两个宏函数能够帮助我们定义中断服务函数入口,例如我们想定义vector0作为中断0的入口,那么只需要写入下面的代码:

1
TRAPHANDLER_NOEC(vector0, 0)    // 中断0 入口为 vector0,向量号为0

这个宏会被扩展为:

1
2
3
4
5
6
7
.globl vector0;                            
.type vector0, @function;
.align 2;
vector0:
pushl $0; /* 错误码占位 */
pushl $0;
jmp _alltraps
具体实现

根据上面的两个宏,我们能够写出入口函数的定义如下所示,需要注意的是我们要查询硬件手册,看哪些中断要记录Error Code,哪些不需要。同时,中断向量号已经给出了我们宏定义,具体实现如下:

1
2
3
4
5
6
7
8
9
10
11
12
13
14
15
16
17
18
19
20
21
22
23
24
/* Set up the entries for traps, care about whether
* the interrupt has error code, if not, use TRAPHANDLER_NOEC
* otherwise use the TRAPHANDLER
*/
TRAPHANDLER_NOEC(divide_entry, T_DIVIDE) # vector0: divide zero, NOEC
TRAPHANDLER_NOEC(debug_entry, T_DEBUG) # vector1: debug exception, NOEC
TRAPHANDLER_NOEC(nmi_entry, T_NMI) # vector2: non-maskable interrupt, NOEC
TRAPHANDLER_NOEC(breakpoint_entry, T_BRKPT) # vector3: breakpoint, NOEC
TRAPHANDLER_NOEC(overflow_entry, T_OFLOW) # vector4: overflow, NOEC
TRAPHANDLER_NOEC(bound_entry, T_BOUND) # vector5: bounds check, NOEC
TRAPHANDLER_NOEC(illop_entry, T_ILLOP) # vector6: illegal opcode
TRAPHANDLER_NOEC(device_entry, T_DEVICE) # vector7: device not available
TRAPHANDLER(dblflt_entry, T_DBLFLT) # vector8: double fault
# TRAPHANDLER_NOEC(coproc_entry, T_COPROC) # vector9: reserved
TRAPHANDLER(tss_entry, T_TSS) # vector10: invalid task switch segment
TRAPHANDLER(segnp_entry, T_SEGNP) # vector11: segment not present
TRAPHANDLER(stack_entry, T_STACK) # vector12: stack exception
TRAPHANDLER(gpflt_entry, T_GPFLT) # vector13: general protection fault
TRAPHANDLER(pgflt_entry, T_PGFLT) # vector14: page fault
# TRAPHANDLER_NOEC(res_entry, T_RES) # vector15: reserved
TRAPHANDLER_NOEC(fperr_entry, T_FPERR) # vector16: floating point error
TRAPHANDLER(align_entry, T_ALIGN) # vector17: aligment check
TRAPHANDLER_NOEC(mchk_entry, T_MCHK) # vector18: machine check
TRAPHANDLER_NOEC(simderr_entry, T_SIMDERR) # vector19: SIMD floating point error

编写_alltraps函数

函数功能

通过查看xv6 手册中关于alltrap的讲解,可知这个函数完成了如下几件事请:

  • %ds%es%fs%gs进行保存
  • 然后将eaxecxedxebxoespebpesiedi这些寄存器进行保存,这些操作可以用pushal一次性实现
  • GD_KD载入%ds%es
  • pushl %esp ,向trap()传递一个指向陷帧的指针
  • call traptrap可以返回吗?)
具体实现

根据上面总结的功能,我们能够得到_alltraps的实现如下:

1
2
3
4
5
6
7
8
9
10
11
12
13
14
15
16
17
18
19
.globl _alltraps
_alltraps:
# Step1: push ds, es, fs and gs separately
pushl %ds # check the trap frame and get the length of the registers
pushl %es
pushl %fs
pushl %gs

# Step2: push general purpose registers using pushal
pushal

# Step3: load GD_KD in %ds and %es using movw
movw $(GD_KD), %ax
movw %ax, %ds
movw %ax, %es

# Step4: call trap(tf), where tf=%esp
pushl %esp
call trap

修改trap_init(),初始化idt,令其指向trapentry.S中定义的每一个入口

函数功能

trap_init()函数的功能就是初始化idt,将idt数组中第$i$个值idt[i]设置为trapentry.S定义的入口。这里需要我们了解idt的具体格式,参考x86_idt.pdf (mit.edu)。在mmu.h中定义了struct Gatedesc对中断描述符进行描述,具体即每一位的作用

1
2
3
4
5
6
7
8
9
10
11
struct Gatedesc {
unsigned gd_off_15_0 : 16; // low 16 bits of offset in segment
unsigned gd_sel : 16; // segment selector
unsigned gd_args : 5; // # args, 0 for interrupt/trap gates
unsigned gd_rsv1 : 3; // reserved(should be zero I guess)
unsigned gd_type : 4; // type(STS_{TG,IG32,TG32})
unsigned gd_s : 1; // must be 0 (system)
unsigned gd_dpl : 2; // descriptor(meaning new) privilege level
unsigned gd_p : 1; // Present
unsigned gd_off_31_16 : 16; // high bits of offset in segment
};

我们使用SETGATE宏函数实现idt到入口的绑定,该函数见本文附录,为了正确调用这个函数,需要依次考虑如下问题:

  • 中断服务函数入口的代码段在哪里?在内核的代码段,查看memlayout.h可知,为GD_KT(0x08)
  • 是什么类型的,中断?异常?查看中断描述符手册
  • 中断服务函数入口的偏移量又是多少 ?即TRAPHANDLERTRAPHANDLER_NOEC定义的函数的偏移量
具体实现

具体绑定过程代码如下:

点击显/隐内容
1
2
3
4
5
6
7
8
9
10
11
12
13
14
15
16
17
18
19
20
21
22
23
24
25
26
void trap_init(void){
extern struct Segdesc gdt[];

SETGATE(idt[T_DIVIDE], 0, GD_KT, divide_entry, 0)
SETGATE(idt[T_DEBUG], 1, GD_KT, debug_entry, 0)
SETGATE(idt[T_NMI], 1, GD_KT, nmi_entry, 0)
SETGATE(idt[T_BRKPT], 0, GD_KT, breakpoint_entry, 0)
SETGATE(idt[T_OFLOW], 0, GD_KT, overflow_entry, 0)
SETGATE(idt[T_BOUND], 0, GD_KT, bound_entry, 0)
SETGATE(idt[T_ILLOP], 0, GD_KT, illop_entry, 0)
SETGATE(idt[T_DEVICE], 0, GD_KT, device_entry, 0)
SETGATE(idt[T_DBLFLT], 0, GD_KT, dblflt_entry, 0)
//SETGATE(idt[T_COPROC], 0, GD_KT, coproc_entry, 0)
SETGATE(idt[T_TSS], 0, GD_KT, tss_entry, 0)
SETGATE(idt[T_SEGNP], 0, GD_KT, segnp_entry, 0)
SETGATE(idt[T_STACK], 0, GD_KT, stack_entry, 0)
SETGATE(idt[T_GPFLT], 0, GD_KT, gpflt_entry, 0)
SETGATE(idt[T_PGFLT], 0, GD_KT, pgflt_entry, 0)
//SETGATE(idt[T_RES], 0, GD_KT, res_entry, 0)
SETGATE(idt[T_FPERR], 0, GD_KT, fperr_entry, 0)
SETGATE(idt[T_ALIGN], 0, GD_KT, align_entry, 0)
SETGATE(idt[T_MCHK], 0, GD_KT, mchk_entry, 0)
SETGATE(idt[T_SIMDERR], 0, GD_KT, simderr_entry, 0)

...
}

结果写完之后一运行,提示这些函数入口都没定义,这个就很难受了,参考xv6的源码,我们还需要在trapentry.S中手动添加*_entry的入口地址,在trapentry.S中设置一个代码段,创建vectors数组,将每一个*_entry对应的地址进行保存:

点击显/隐内容
1
2
3
4
5
6
7
8
9
10
11
12
13
14
15
16
17
18
19
20
21
22
23
.data
.globl vectors
vectors:
.long divide_entry
.long debug_entry
.long nmi_entry
.long breakpoint_entry
.long overflow_entry
.long bound_entry
.long illop_entry
.long device_entry
.long dblflt_entry
# .long coproc_entry
.long tss_entry
.long segnp_entry
.long stack_entry
.long gpflt_entry
.long pgflt_entry
# .long res_entry
.long fperr_entry
.long align_entry
.long mchk_entry
.long simderr_entry

在有了vectors数组后,我们还可以采用循环的方式对idt进行初始化,代码如下:

1
2
3
4
5
6
7
8
9
10
11
12
13
14
15
16
17
void
trap_init(void)
{
extern struct Segdesc gdt[];

// LAB 3: Your code here.
uint16_t i;
// Initialize the first 19 idt by using a loop
for(i = 0; i < 19; ++i){
SETGATE(idt[i], 0, GD_KT, vectors[i], 0)
}
SETGATE(idt[T_DEBUG], 1, GD_KT, vectors[T_DEBUG], 0)
SETGATE(idt[T_BRKPT], 0, GD_KT, vectors[T_BRKPT], 3) // Int 3's DPL is 3
SETGATE(idt[T_NMI], 1, GD_KT, vectors[T_NMI], 0)
// Per-CPU setup
trap_init_percpu();
}

这里我们只针对前19个idt进行初始化,其他的先忽略。

调试与总结

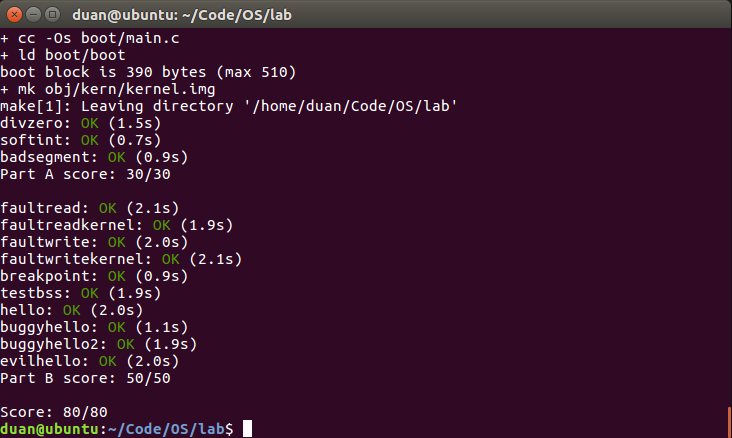
在完成上面的相关代码后,我们现在应该能够运行用户程序,然后对异常进行处理,运行make grade应该能够通过 divzerosoftintbadsegment三个测试,通过part A,然后获得三十分。然而我的代码有问题,需要进行调试。

我们先针对divzero进行调试,查看divzero的输出日志,截取其中的栈帧部分,可以看到如下内容:

点击显/隐内容
1
2
3
4
5
6
7
8
9
10
11
12
13
14
15
16
TRAP frame at 0xefffffb4
edi 0x00000000
esi 0x00000000
ebp 0xeebfdfd0
oesp 0xefffffd4
ebx 0x00000000
edx 0x00000000
ecx 0x00000000
eax 0x00000001
es 0x----0023
ds 0x----0023
trap 0x00000023 (unknown trap)
err 0x00000023
eip 0x00000000
cs 0x----0000
flag 0x0080004e

可以看到trap一行显示的是 unknown trap。除零应当是除零中断,怎么能是unknown trap呢,说明我们在处理栈帧的时候出现了问题,最有可能的是_alltraps写错了,导致栈布局不对。经过对比,因为我直接参考了xv6的代码,所以多压入了两个寄存器,直接导致栈布局错误,将下面两行删除即可:

# pushl %fs
# pushl %gs  

现在运行可以通过divzero,然后此处我又犯了一个小bug,由于我使用循环的方式对前19个中断进行处理,然而上面的代码中我注释掉了两个保留的中断向量入口,这就导致idtvectors的映射关系错误了,后面的中断都往前移动了一个,所以如果不是采用一一赋值的方式,上面的代码就不能注释掉,并检查对应关系。修改之后即可通过Part A。

问题:回答下面的问题

  1. 为何每个中断/异常都要有自己独立的服务函数,如果所有的中断/异常都被送入同一个入口,那么上面的什么机制无法实现?
  2. 是否需要做一些修改,使得user/softint表现正常?打分脚本期望产生一个通用保护错误(trap 13),但是softint的代码中写了int $14。为何触发了中断向量13?如果内核允许softintint $14命令触发一个缺页异常,会发生什么?

回答:

  1. 错误码无法实现,因为有的中断保存错误码,有的不保存,所以必须要不同的入口
  2. 在这里我们首先要明白什么情况会触发trap 13,通过查阅80386手册9.8.13节可知,所有的不触发其他中断的错误,都被归类为GP,其中第14条说:如果在非内核态(privilege 0)中触发中断,那么就会产生这个异常。所以我们不需要修改,操作系统的处理是正确的。如果引发了一个缺页异常,就是用户态直接调用了中断指令,这样做有悖于其优先级。

第二部分:页错误、断点异常、系统调用

处理页错误

页错误(中断号14:T_PGFLT)是一个非常重要的异常。当处理器触发页错误后,会在CR2中保存触发页错误的指令的地址。 在trap.c 我们提供了 page_fault_handler()处理页错误。

练习5:修改 trap_dispatch() ,向page_fault_handler()发送页错误。现在make grade应该能通过faultreadfaultreadkernelfaultwrite以及faultwritekernel。你可以使用make run-x命令令JOS启动后执行对应的用户程序,例如make run-divzero

trap_dispatch()

这个函数的功能是根据不同的中断号,调用具体的服务函数,dispatch的意思是派遣。那么为了解决page fault,我们只需要写下下面的代码:

1
2
3
4
5
6
7
8
9
10
11
12
13
14
15
16
17
18
19
20
21
22
23
24
25
26
static void
trap_dispatch(struct Trapframe *tf)
{
// Handle processor exceptions.
// Handle the trap according to the trap num
switch (tf->tf_trapno)
{
// Handle the page fault (vector 14)
case T_PGFLT:
page_fault_handler(tf);
break;

// Unexpected trap: The user process or the kernel has a bug.
default:
print_trapframe(tf);
if (tf->tf_cs == GD_KT){
panic("unhandled trap in kernel");
}
else {
env_destroy(curenv);
return;
}
break;
}

}

现在应该能够通过题目中说的几个函数,再拿到20分

断点异常

断点异常(T_BRKPT=3)允许调试器在代码中插入断点,这个异常一般用于调试器插入断点,通过替换相关语句为一个1 byte的int3软中断指令。在JOS中,我们将针对该指令做一些调整,令其变为一个伪系统调用供用户程序使用。实际上,lib/panic.c中的panic()函数就通过调用int3实现了中断过程。

练习6:修改 trap_dispatch() ,添加断点异常并激活kernel monitor

这个任务比较简单,直接给出代码,先写一个breakpoint的handler函数,然后在trap_dispatch中添加对应的路径即可

1
2
3
4
5
void 
breakpoint_handler(struct Trapframe *tf)
{
monitor(tf); // invoke the kernel monitor
}

这里需要注意的是int3的DPL为3,即SETGATE的最后一个参数是3,否则用户进程无法激活该中断。

挑战任务!:修改 trap_dispatch() ,添加断点异常,使得程序能够从当前位置继续执行(即在由断点异常引发的int3语句执行后)。实现真正的单步调试功能。你需要掌握EFLAGS中每一位的作用。

问题

  1. 根据IDT初始化的过程,breakpoint中断会产生通用保护错误或者断点异常。为什么?你需要如何设置IDT,使得breakpoint产生断点异常?
  2. 你认为这个机制的目的是什么?

回答:

  1. 我们需要设置breakpoint中断idt的DPL为3,这样就允许用户进程激活该中断。
  2. 这个机制一方面可以保护内核,让用户进程不能随意动用中断来进入内核态;另一方面也开放了一些中断,方便用户执行一些特定的功能,例如断点调试等。

系统调用

用户进程通过系统调用向内核请求服务。当用户进程激活系统调用后,处理器会进入内核态,处理器和内核共同合作保存用户进程的状态,随后内核执行系统调用,然后返回用户进程。

在JOS中,我们使用int指令产生处理器中断。我们将int $0x30用作系统调用中断,中断号为T_SYSCALL。设置系统调用中断的idt,使得用户能够触发该中断。

应用会将系统调用号和系统调用参数放置在寄存器中。这样,内核不需要在用户进程的栈或者指令流中读取。系统调用号将被放入%eax中,参数(最多五个)将分别进入 %edx%ecx%ebx%edi%esi。内核将返回值放入%eax。在lib/syscall.csyscall()函数中提供了激活系统调用的代码,阅读并理解其中的内容(lib中的syscall是给用户使用的,通过int指令激活系统调用)。

练习7:添加系统调用中断T_SYSCALL的服务函数,编辑kern/trapentry.Skern/trap.ctrap_init()。修改trap_dispatch(),通过调用kern/syscall.csyscall(),并根据适当的参数,处理系统调用。将返回值保存在%eax中。最后,修改kern/syscall.csyscall()。请阅读lib/syscall.c,并弄明白里面的内联汇编语句。通过激活对应的内核函数,处理inc/syscall.h中的所有系统调用。

通过make run-hello运行user/hello,现在应当在控制台打印”hello world”,并触发页错误。同时,make grade应当能通过testbss

练习7可以分为如下几个部分分别完成:

阅读lib/syscall.c

这个文件中syscall()函数的关键代码是一句内联汇编,关于内联汇编可以参考关于内联汇编的讲解。这句内联汇编如下所示:

1
2
3
4
5
6
7
8
9
10
11
asm volatile("int %1\n"       // volatile 禁止优化  
// %1 表示第二个参数,即下面的输出和输入顺序中第二个参数,此处为 T_SYSCALL
: "=a" (ret) // 输出,从ax寄存器输出至ret
: "i" (T_SYSCALL), // 输入,将T_SYSCALL输入至i寄存器
"a" (num), // 输入,将num输入至a寄存器
"d" (a1), // ...
"c" (a2),
"b" (a3),
"D" (a4),
"S" (a5)
: "cc", "memory");

添加系统调用中断的框架

和上面的几个中断类似,这里直接给出代码。首先,在trap.htrap.c中分别加入下面的代码:

1
2
3
4
5
6
7
8
9
10
11
12
/*在 trap.h 中添加服务函数声明*/
void system_call_handler(struct Trapframe *);

/*在 trap.c 中添加服务函数定义*/
/*
* system call (interrupt 48) handler
*/
void
system_call_handler(struct Trapframe *tf)
{
//
}

然后在trapentry.S中添加入口:

1
2
3
TRAPHANDLER_NOEC(syscall_entry, T_SYSCALL)        # vector48: system call

.long syscall_entry

trap_init()中设置系统调用idt

1
2
SETGATE(idt[T_SYSCALL], 0, GD_KT, syscall_entry_, 3)  // 这里因为系统调用号是48,和前面的不相连
// 能重新定义一个变量保存其服务函数入口

最后在trap_dispatch()中添加系统调用处理分支

1
2
3
case T_SYSCALL:
system_call_handler(tf);
break;

编写系统调用服务函数

系统调用服务函数的主要职责就是获取系统调用参数,并调用syscall函数。

1
2
3
4
5
6
7
8
9
10
11
void 
system_call_handler(struct Trapframe *tf)
{
uint32_t syscallno = tf->tf_regs.reg_eax;
uint32_t arg1 = tf->tf_regs.reg_edx;
uint32_t arg2 = tf->tf_regs.reg_ecx;
uint32_t arg3 = tf->tf_regs.reg_ebx;
uint32_t arg4 = tf->tf_regs.reg_edi;
uint32_t arg5 = tf->tf_regs.reg_esi;
syscall(syscallno, arg1, arg2, arg3, arg4, arg5); // Error! Without a return value
}

然而上面这个函数有点问题,我们没有保存系统调用的返回值,根据syscall.c中的内联汇编代码,我们需要将返回值存储至eax寄存器中,所以上面的代码需要稍作修改:

1
tf->tf_regs.reg_eax = syscall(syscallno, arg1, arg2, arg3, arg4, arg5);

编写syscall()

kern/syscall.c中,根据系统调用编号,调用对应的系统调用服务函数。这里主要注意一下输入参数和返回值即可,实现如下:

1
2
3
4
5
6
7
8
9
10
11
12
13
14
15
16
17
18
19
20
21
22
23
// Dispatches to the correct kernel function, passing the arguments.
// Returns >= on success, < 0 on error. Errors are:
// -E_INVAL if syscallno is invalid
int32_t
syscall(uint32_t syscallno, uint32_t a1, uint32_t a2, uint32_t a3, uint32_t a4, uint32_t a5)
{
// Call the function corresponding to the 'syscallno' parameter.
// Return any appropriate return value.
// LAB 3: Your code here.
switch (syscallno) {
case SYS_cgetc:
return sys_cgetc();
case SYS_cputs:
sys_cputs((const char*)a1, a2);
return 0;
case SYS_getenvid:
return sys_getenvid();
case SYS_env_destroy:
return sys_env_destroy((envid_t)a1);
default:
return -E_INVAL;
}
}

改进:使用Python脚本自动生成trapentry.S

自己手写维护trapentry.S中的中断入口不仅耗时耗力,还很容易出错,因此这里用python写一个脚本,自动生成包含256个中断的中断服务函数入口,以及保存这些入口的vectors数组。基本思路是采用循环语句构造中断服务函数入口函数以及入口函数地址数组。然后再对Makefile进行修改。脚本就不在此处列出了。

Challenge! Implement system calls using the sysenter and sysexit instructions instead of using int 0x30 and iret.

The sysenter/sysexit instructions were designed by Intel to be faster than int/iret. They do this by using registers instead of the stack and by making assumptions about how the segmentation registers are used. The exact details of these instructions can be found in Volume 2B of the Intel reference manuals.

The easiest way to add support for these instructions in JOS is to add a sysenter_handler in kern/trapentry.S that saves enough information about the user environment to return to it, sets up the kernel environment, pushes the arguments to syscall() and calls syscall() directly. Once syscall() returns, set everything up for and execute the sysexit instruction. You will also need to add code to kern/init.c to set up the necessary model specific registers (MSRs). Section 6.1.2 in Volume 2 of the AMD Architecture Programmer’s Manual and the reference on SYSENTER in Volume 2B of the Intel reference manuals give good descriptions of the relevant MSRs. You can find an implementation of wrmsr to add to inc/x86.h for writing to these MSRs here.

Finally, lib/syscall.c must be changed to support making a system call with sysenter. Here is a possible register layout for the sysenter instruction:

1
2
3
4
5
eax                - syscall number
edx, ecx, ebx, edi - arg1, arg2, arg3, arg4
esi - return pc
ebp - return esp
esp - trashed by sysenter

GCC’s inline assembler will automatically save registers that you tell it to load values directly into. Don’t forget to either save (push) and restore (pop) other registers that you clobber, or tell the inline assembler that you’re clobbering them. The inline assembler doesn’t support saving %ebp, so you will need to add code to save and restore it yourself. The return address can be put into %esi by using an instruction like leal after_sysenter_label, %%esi.

Note that this only supports 4 arguments, so you will need to leave the old method of doing system calls around to support 5 argument system calls. Furthermore, because this fast path doesn’t update the current environment’s trap frame, it won’t be suitable for some of the system calls we add in later labs.

You may have to revisit your code once we enable asynchronous interrupts in the next lab. Specifically, you’ll need to enable interrupts when returning to the user process, which sysexit doesn’t do for you.

Makefile的编写

在编写了对应的python脚本后,我们希望将其写入Makefile中,使其自动化运行,我们最终生成的目标为kern/vectors.S,依赖文件为kern/vectors.py,因此我们可以在kern/Makefrag下添加这样一段:

1
2
kern/vectors.S: kern/vectors.py
python kern/vectors.py > $@

当makefile需要依赖kern/vectors.S时,就会找到kern/vector.S,然后执行python命令行,生成vectors.S。查看makefile,我们发现依赖kern/vectors.S的文件为:

1
2
3
4
$(OBJDIR)/kern/%.o: kern/%.S $(OBJDIR)/.vars.KERN_CFLAGS
@echo + as $<
@mkdir -p $(@D)
$(V)$(CC) -nostdinc $(KERN_CFLAGS) -c -o $@ $<

我们需要将第一行修改为:

1
$(OBJDIR)/kern/%.o: kern/%.S kern/vectors.S $(OBJDIR)/.vars.KERN_CFLAGS

声明对于kern/vectors.S的依赖关系。这里还有一个疑问,我本来想直接写:

1
2
kern/%.S: kern/vectors.py
python kern/vectors.py > vectors.S

即不显式声明对某个文件的依赖,而是用通配符进行处理,但是并不行。这个问题目前暂未解决,先这样吧。

用户模式起步

一个用户程序在lib/entry.S的顶部启动。经过一些配置,这个代码调用位于lib/libmain.clibmain()。修改libmain(),初始化全局指针thisenv,指向envs[]中当前进程的struct Env 。提示:参考inc/env.h并使用sys_getenvid

libmain()随后调用umain,这个函数定义在具体的用户程序中。在hello程序中为user/hello.c。注意到打印了”hello, world“后,umain()试图访问thisenv->env_id。而该指针还未初始化好,所以出现了错误。现在我们初始化了thisenv,因此不会出错。如果依然有错误,那么UENVS这个空间可能被设置为了用户不可读。

练习8:在用户库中添加所需的代码,支持用户程序运行。你应当看到user/hello打印hello, world以及i am environment 00001000,然后尝试调用sys_env_destroy()退出(参考lib/libmain.clib/exit.c)。由于当前内核仅支持一个用户程序,因此内核会报告销毁了唯一的进程,并进入了内核监视器。现在,make grade应当能够通过hello测试。

练习8要求我们初始化全局指针thisenv并指向envs中的当前进程,我们需要做两件事情:

  • 找到当前进程
  • 将当前进程对应的地址赋值给thisenv

第一个任务是靠sys_getenvid()ENVX实现的,查阅inc/env.h,我们可以知道如何找到进程id,并根据id找到进程在envs数组中的位置。

1
2
3
// The environment index ENVX(eid) equals the environment's index in the
// 'envs[]' array. The uniqueifier distinguishes environments that were
// created at different times, but share the same environment index.

解决了第一个问题,第二个就很简单了,我们只需要修改libmain.c,加一句话即可。

1
2
3
4
5
6
7
8
9
void
libmain(int argc, char **argv)
{
// set thisenv to point at our Env structure in envs[].
// LAB 3: Your code here.
thisenv = &envs[ENVX(sys_getenvid())];

...
}

页错误与内存保护

操作系统依赖于硬件实施内存保护。内核会通知硬件,哪些虚拟内存是有效的,哪些不是。当一个程序尝试访问无效内存或者无权限内存,处理器会在触发错误的指令处停止该语句,并带着相关信息进入内核。如果错误是可修复的,内核修复错误并继续执行程序;否则程序无法继续执行。

As an example of a fixable fault, consider an automatically extended stack. In many systems the kernel initially allocates a single stack page, and then if a program faults accessing pages further down the stack, the kernel will allocate those pages automatically and let the program continue. By doing this, the kernel only allocates as much stack memory as the program needs, but the program can work under the illusion that it has an arbitrarily large stack.

System calls present an interesting problem for memory protection. Most system call interfaces let user programs pass pointers to the kernel. These pointers point at user buffers to be read or written. The kernel then dereferences these pointers while carrying out the system call. There are two problems with this:

  1. 内核页错误更严重. If the kernel page-faults while manipulating its own data structures, that’s a kernel bug, and the fault handler should panic the kernel (and hence the whole system). But when the kernel is dereferencing pointers given to it by the user program, it needs a way to remember that any page faults these dereferences cause are actually on behalf of the user program.
  2. The kernel typically has more memory permissions than the user program. The user program might pass a pointer to a system call that points to memory that the kernel can read or write but that the program cannot. The kernel must be careful not to be tricked into dereferencing such a pointer, since that might reveal private information or destroy the integrity of the kernel.

For both of these reasons the kernel must be extremely careful when handling pointers presented by user programs.

You will now solve these two problems with a single mechanism that scrutinizes all pointers passed from userspace into the kernel. When a program passes the kernel a pointer, the kernel will check that the address is in the user part of the address space, and that the page table would allow the memory operation.

Thus, the kernel will never suffer a page fault due to dereferencing a user-supplied pointer. If the kernel does page fault, it should panic and terminate.

Exercise 9.

  • Change kern/trap.c to panic if a page fault happens in kernel mode. Hint: to determine whether a fault happened in user mode or in kernel mode, check the low bits of the tf_cs.

  • Read user_mem_assert in kern/pmap.c and implement user_mem_check in that same file.

  • Change kern/syscall.c to sanity (理智) check arguments to system calls.

  • Boot your kernel, running user/buggyhello. The environment should be destroyed, and the kernel should not panic. You should see:

1
2
3
[00001000] user_mem_check assertion failure for va 00000001
[00001000] free env 00001000
Destroyed the only environment - nothing more to do!
  • Finally, change debuginfo_eip in kern/kdebug.c to call user_mem_check on usd, stabs, and stabstr. If you now run user/breakpoint, you should be able to run backtrace from the kernel monitor and see the backtrace traverse into lib/libmain.c before the kernel panics with a page fault. What causes this page fault? You don’t need to fix it, but you should understand why it happens.

练习9一共给了5个任务,我们依次完成:

修改 kern/trap.c,当内核发生页错误时,panic

这里提示我们使用 tf_cs的低位对内核和用户模式进行判断,如果页错误在内核,就将内核中止。这段代码比较简单,在page_fault_handler中添加下面的代码即可:

1
2
3
4
5
6
7
8
9
void
page_fault_handler(struct Trapframe *tf){
// LAB 3: Your code here
...
if(tf->tf_cs == GD_KT){
panic("kernel mode page faults");
}
...
}

实现user_mem_check

函数功能

Check that an environment is allowed to access the range of memory [va, va+len) with permissions perm | PTE_P. Normally perm will contain PTE_U at least, but this is not required. va and len need not be page-aligned; you must test every page that contains any of that range. You will test either len/PGSIZE, len/PGSIZE + 1, or len/PGSIZE + 2 pages.

函数原型
1
2
3
4
5
6
int
user_mem_check(struct Env *env, const void *va, size_t len, int perm)
{
// LAB 3: Your code here.
return 0;
}
函数实现

为了对[va, va+len)进行检查,我们需要完成以下工作:

  • 进行内存对齐,找到包含[va, va+len)的最小对齐内存
  • 依次遍历,判断内存是否合法,如果不合法,记录非法内存所在地址
    • 内存是否在用户区域内?(start < ULIM)
    • pte是否非空?
    • pte是否符合perm的要求?(pte & perm == perm)
1
2
3
4
5
6
7
8
9
10
11
12
13
14
15
16
17
18
19
20
21
22
23
24
25
26
int
user_mem_check(struct Env *env, const void *va, size_t len, int perm)
{
// 'va' and 'len' need not be page-aligned;
// To make sure that all the memory can be covered, we need to align the
// address. [start, [va, va + len], end];
void* start = (void*) ROUNDDOWN((uint32_t)va, PGSIZE);
void* end = (void*) ROUNDUP((uint32_t)(va+len), PGSIZE);

// You must test every page that contains any of that range.
// You will test either 'len/PGSIZE', 'len/PGSIZE + 1', or 'len/PGSIZE + 2' pages.
for(; start < end; start += PGSIZE){
pte_t *pte = pgdir_walk(env->env_pgdir, (void *)start, 0);
// A user program can access a virtual address if (1) the address is below
// ULIM, and (2) the page table gives it permission. These are exactly
// the tests you should implement here.
if((uintptr_t)start >= ULIM || !pte || !(*pte & PTE_P) || ((*pte & perm) != perm)){
// If there is an error, set the 'user_mem_check_addr' variable to the first
// erroneous virtual address.
user_mem_check_addr = (uintptr_t)(start < va ? va : start);
return -E_FAULT; // Returns -E_FAULT if memory is invalid
}
}
// Returns 0 if the user program can access this range of addresses.
return 0;
}

修改 kern/syscall.c,检查syscall的调用参数

由于sys_cputs系统调用要对内存进行写操作,因此我们要检查内存是否有效,在/kern/syscall.csys_cputs函数中加入进行检查即可。

1
user_mem_assert(curenv, (void*)s, len, PTE_P|PTE_U);

运行并查看结果

现在你的程序应当能够通过所有的测试,并获得相应的分数。至此,Lab3已经全部完成。

图片名称

附录

其他几个重要但是不需要我们完成的函数

env_pop_tf(struct Trapframe *tf)

1
2
3
4
5
6
7
8
9
10
11
12
13
14
15
16
17
18
19
20
// Restores the register values in the Trapframe with the 'iret' instruction.
// This exits the kernel and starts executing some environment's code.
//
// This function does not return.
//
void
env_pop_tf(struct Trapframe *tf)
{
asm volatile(
"\tmovl %0,%%esp\n" // 将%esp指向tf地址处
"\tpopal\n" // 弹出Trapframe结构中的tf_regs值到通用寄存器
"\tpopl %%es\n" // 弹出Trapframe结构中的tf_es值到%es寄存器
"\tpopl %%ds\n" // 弹出Trapframe结构中的tf_ds值到%ds寄存器
"\taddl $0x8,%%esp\n" /* skip tf_trapno and tf_errcode */
"\tiret\n" // 中断返回指令,具体动作如下:从Trapframe结构中依次弹出tf_eip,tf_cs,tf_eflags,tf_esp,tf_ss到相应寄存器
:
: "g" (tf) // 输入操作数
: "memory");
panic("iret failed"); /* mostly to placate the compiler */
}

这个函数将一个陷帧弹出,将其中的值恢复给寄存器,即恢复到tf描述的状态。

SETGATE

1
2
3
4
5
6
7
8
9
10
11
12
13
14
15
16
17
18
19
20
21
22
23
24
25
26
27
// Set up a normal interrupt/trap gate descriptor.
// - istrap: 1 for a trap (= exception) gate, 0 for an interrupt gate.
// see section 9.6.1.3 of the i386 reference: "The difference between
// an interrupt gate and a trap gate is in the effect on IF (the
// interrupt-enable flag). An interrupt that vectors through an
// interrupt gate resets IF, thereby preventing other interrupts from
// interfering with the current interrupt handler. A subsequent IRET
// instruction restores IF to the value in the EFLAGS image on the
// stack. An interrupt through a trap gate does not change IF."
// 为了正确设置gate,我们需要知道哪些是trap,哪些是interrupt,参考
// - sel: Code segment selector for interrupt/trap handler
// - off: Offset in code segment for interrupt/trap handler
// - dpl: Descriptor Privilege Level -
// the privilege level required for software to invoke
// this interrupt/trap gate explicitly using an int instruction.
#define SETGATE(gate, istrap, sel, off, dpl) \
{ \
(gate).gd_off_15_0 = (uint32_t) (off) & 0xffff; \
(gate).gd_sel = (sel); \
(gate).gd_args = 0; \
(gate).gd_rsv1 = 0; \
(gate).gd_type = (istrap) ? STS_TG32 : STS_IG32; \
(gate).gd_s = 0; \
(gate).gd_dpl = (dpl); \
(gate).gd_p = 1; \
(gate).gd_off_31_16 = (uint32_t) (off) >> 16; \
}

这个函数需要注意的是其中的sel段,这个段设置了中断/陷入handler的代码段,同时,off设置了代码段偏移量

参考文献

0%